♥ need help finding something on my blog? just type in a key-word !

Sunday, February 27, 2011

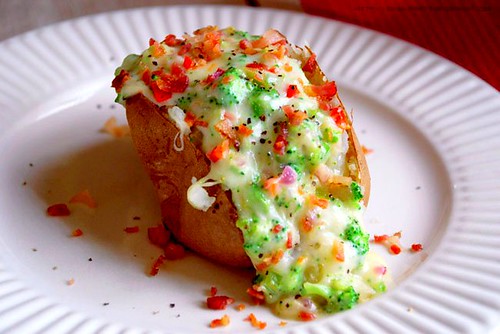
Baked Potato with a "Grate" Cheese Topping;

2 words.
Cheese & Potatoes.
Okay, now that i have your attention,
can i say that THIS IS ABSOLUTELY DELICIOUS ?!
i ate 2 whole potatoes just for breakfast alone.  MMmmMmm.. 
Actually, just looking at these pictures again makes me want to make another,
can you say Midnight Snack? haha .

You know that moment,
when you see your baked potato during its last 5 seconds of perfection, right before you stab your fork in it?
When you see the bubbly melting cheese oozing over the skin, and all the toppings piled high on that potato, hiding that starchy goodness within.
Ooh~ and that moment you put your fork in it and you purposely lift that bite a bit higher than your lips, JUST so u could see all that yummy cheese stretching?
Yes. that is what this dish provides.
Comfort, Major Deliciousness . & Satisfaction Guaranteed !

Prettiest potato ive ever seen!
Definitely makes me drool, haha
The Perfect Baked Potato
Recipe ;
- 2 Medium sized Potatoes, Baked
- 1 cup Montery Jack Cheese
- about 3-4 Branches of broccoli chopped
- 2 tbs chopped red onion
- 2 tbs chopped picked peppers
- Bacon bits (optional)
- Salt & Pepper to taste
In a bowl combine ingredients 2-5 & microwave for
1 minute, or until cheese is completely melted.
While microwaving the cheese, cut the potato in half &
(* TIP: pinch the sides of the potato while pushing inward,
it`ll help give that "overfilling"  look.)
Spoon insides a bit to make the potato "chunky".
Then, just spoon on the Cheese topping, sprinkle some
salt & pepper over the top, and enjoy this yummminess!
*Serves 2

Thursday, February 24, 2011

Valentines Day Cookies ;

i know its a bit late to be posting for Valentines Day,
but i couldnt expose what i made until everyone that were sent cookies, received them.
anyway these lovelies have a pretty long name.
They are.... (drum roll please) *
Heart Shaped Cinnamon Short Bread Cookies Covered with Dark Chocolate, Hazelnuts, & Almonds.
whew.
yea... that didnt really fit in my title box for this entry. haha
Anyway, by the feedback given to me by the receivers;
theses were apparently a big hit!
So, not only are they yummy, these cookies look absolutely elegant as well.
Making it the perfect thoughtful Valentines Day gift~
Heart Shaped Cinnamon Short Bread Cookies Covered
with Dark Chocolate, Hazelnuts, & Almonds.
they literally just dissolve in your mouth~
To Prepare the Dough
Recipe ;
- 2 sticks unsalted butter (1cup)
- 3/4 cup powdered sugar
- 1 tbs vanilla extract
- 2 cups sifted all purpose flour + more for dusting
- 1/2 tsp salt
- 2 1/2 tbs ground cinnamon
With an electric mixer, cream butter, sugar, and vanilla.
Then (in low speed) slowly add in flour, cinnamon & salt,
until dough forms.
Wrap the dough and store it in the fridge for at least 2 hrs or
over night.
Handling The Dough
Once you remove the dough out of the fridge, knead until
dough is soft enough to work with.
if its too hard, then put it in the microwave for 15 seconds,
and continue to knead with hands.
Flour your table, and continue to roll out and flatten with
a rolling pin, until desired thickness.
*Reminder : these will not expand, due to the lack of
baking soda.


Cutting Out Shapes
Since it was Valentines i used my heart shaped mold,
but feel free to use any you like. Flowers, Leaf, Circles
would be lovely as well.
Be careful when handling these though, with all that butter
in the dough, these turn very soft easily. It helps to handle
them with a floured table top.
*Tip :try not to get any flour on the top of your cookies,
it will dull the look of them.


Preparing the Oven & Cookies
Lay out your cookies on an ungreased baking sheet &
Preheat your oven to 300 Degrees. 
Place them on the middle rack & bake until edges begin
to brown.
*About 15-20 mins.
Preparing the Nuts
I bought whole toasted almonds and hazel nuts.
& i roughly ran my knife through them and lightly toasted
them in a pan. i avoided buying Pre-chopped nuts, so i
could have a combination of large & small pieces to
sprinkle atop of my cookies. But feel free to mix-up your
choice of nuts & "choppiness" !
Melting The Chocolate
i used Dark Chocolate Candy melts as my dip, but
once again, use any sort of candy melts you'd like.
When my cookies were just a few minutes away from being
done, i began to melt my chocolate, by pouring them in
a bowl (deep enough to dunk half of a cookie into) &
melting them in the microwave in 15 second intervals,
while mixing in between. Once it is completely smooth &
melted, add 1 tsp of vegetable oil into the chocolate and
mix until fully combined.
(add more for thinner chocolate)
Cooling Cookies
See how pale they still are?
This is how you want your cookies to be,  just SLIGHTLY
browned around the edges.
Once theyre out of the oven, be sure to let them
cool completely before dipping.
Dipping Cookies
i dipped my cookies in sort of an angle, 
You do not need your bowl to be completely full of
chocolate to dip, just dip your cookie & move it back &
forth in the chocolate until desired area is covered.
"Nutting" Cookies
Place your dipped cookies down on a cooking rack or 
wax paper & sprinkle your chopped nuts on top.
They dont have to be perfect,
i love that home-made touch they leave behind~
Let them dry at room temperature, or pop them in the fridge
for a few minutes for quicker results.
FINISHED COOKIES!
yay!
i was able to find a clear plastic container at my local crafts
store, which i thought were perfect for these cookies.
i also bought a lacey red ribbon to tie around them as well.
when i stacked these cookies, they couldnt help but lean..
which i will remember next time to drip HALF my cookies
on the right side & the other half on the left side, hehe.
but either way these came out beautiful, and anyone who
tasted them can agree, that these were amazingly yum !
isnt it the most prettiest box of cookies youve ever seen ?
Notes in a Pill Capsul
im sure many of you havnt seen this before,
its a cutesy korean bottle of love notes.
Yes, inside these pills there are strips of paper,
that have been rolled up and tied with a small golden ring,
All contained in a single pill.  SOOooOo ADORABLEEE!
This bottle contains 31 love notes (as you can tell by the
giant 31 on the bottle) haha,
im completely in love with these, theyre such a creative
& fun way to send & receive notes !
Perfect to pair off with a pretty box of cookies.
Dont you agree? 

Monday, February 21, 2011

Spam Musubi ;

Over the weekend i was able to track down some bento supplies!
im pretty excited to use them, and i might be ordering a few other supplies later~
Anyway, one of the items i bought is a rice press,
& with that i made the most perfect spam musubis !
My Bag Full of New Bento Items !

YAY !
2 new bento boxes, picks, rice presses, sauce bottles,
silicon cups, sausage cutters, tri colored sushi haran.

My First Attempt at Making Spam Musuabi!
i thought it was delicious, but i think the next time ill try
making the sauce a bit thicker.
The runny sauce managed to spread-out through the rice
and ended up flavoring the entire mitsubi. YUM !

How to Make the Sauce:
Recipe;
- 1/4 cup oyster sauce
- 1/2 cup white sugar
- 4 tbs low sodium soysauce
feel free to change it up with the measurements according
to preference. The sauce should be sweet & savory.
Making Sushi Rice
i bought korean seeweed sheets, (theyre toasted & crunchy
with oil & salt) theyre a lot more flavorful & easier to bite
into VS the regular sushi sheets.

Recipe for sushi rice ;
- 3 cups of cooked white rice
- 1/3 cups rice vinegar
- 3 tbs white sugar
- 1 tbs salt
mix all ingredients together
Using the Rice-Press & Layering
- Cut the Seaweed sheets in half,

- place the rice press in the middle,
- add about 2 large spoonfuls of rice & press down,
fully submerge the cooked slices of spam into the sauce &
- place on top of the first layer of rice,
- add another 2 large spoonfuls of rice & press down.
Remove the rice-press carefully
& wrap tightly.
To seal edges, wet the edges & press down until sealed.
flip over.
Feel free to cut off the extra seaweed off the edges or fold
like you would a gift, heh.
Bag Full of Spam Musubis !
yumm ! i packed these lovlies for family & friends.
i also made a large container of Miso Soup as well.

This is really a great way to enjoy a simple handheld
snack. i recommend you try itttt !

Friday, February 18, 2011

Astro Boy & Chocolate Covered Strawberries ;

Unfortunately, i have never seen a single episode of Astro Boy in my life,
but it was requested by a very talented Artist ; Arlyn.
Hes an AMAZING artist and creator of  Ogre Shop 
(click the link & check out his amazing work !)
Astro Boy
Requested by & Dedicated to: Arlyn
i hope i didnt mess up on his face too much!
his facial features took me forever to cut out
- insert crying noises here-

So Astro Boy is resting on a mushroom omelet, with a tiny
little heart stuck on a pea. (hoho)
The top left corner is a flowered zucchini sushi roll,
& the right is filled with red onion lace, Peas & Carrot mini
skewers, sliced strawberries & a zucchini checked slice.


  -   -   - - - - -
On another note, this morning i also had a very delicious out-of-the-ordinary breakfast.
Besides devouring Astro Boy, i also made CHOCOLATE COVERED STRAWBERRIES!
They were delicious !
i normally dislike sweets, and i dislike chocolates ..
that is... until my "monthly" comes by, then i get chocolate & sugar cravings..hehe
SOoo, being in the mood for something sweet,
i found a few sad looking strawberries in my fridge, that were on the verge of becoming over-ripe,
i melted some dark chocolate Candy melts & some white chocolate chips & tada!
There were perfect 7 strawberries, just the same amount of house-members i have at home.
so i made one for my 4 younger brothers, my mother & step-dad, they disappeared in seconds!
Chocolate Covered Strawberries
haha you can see the process of me starting off with my
first one the Left,(which looks like total crap).
To finishing off with the far Right one & getting better!
i guess Practice does make perfect, haha


Big-Ass Chocolate Covered Strawberry
Not bad looking for my first time eh? haha
Making these are simple & oh-so-very delicious.

Recipe;
- Strawberries ; Washed  & Dried
- Dark Chocolate Candy Melts
- White Chocolate Chips
slowly melt the Chocolate Candy Melts in the microwave
in 15 second intervals, until completely melted.
Do the same with the white chocolate chips, and spoon into
a corner of a zip-lock bag, cut a TINY bit off the corner,
(you'll be using this to drizzle your berries).
Tip: Wet Strawberries will not allow chocolate to stick,
be sure to dry them off completely with a paper towel
before dipping.
Then Dip, Decorate, let it sit in the fridge for 5 mins
& ENJOYYY !


Tuesday, February 8, 2011

Pikachu Gets Cheeky ;

Once again, here is another Pikachu.
Showing his more erm.. cheeky side ;
(honestly, i think the bunghole is adorable. haha!)
So heres to all the pokemon fanatics!
Any kid born during the 1990's HAD to love pokemon, 
it was a requirement of childhood!
Digimon, Yugi-oh and all those other junk-shows were biters,
i will forever be a pokemon kid .
Requested By & Dedicated to;
a "crazy-ass" friend of mine,
Ariles.
(This pikachu is actually no bigger than my pinky!)
very mini ~


i would also like to thank Ann @ ApplesAndTwinkies,

for my "Stylish Blogger Award"
shes got a great blog goin`, & i love the way she pictures all the ingredients,
before she writes the recipe.  a cute touch !
& for accepting this award im suppose to announce 7 facts about myself,
& pass this award on to 10 other bloggers.
< here it goes - - - - >
Facts ;
1. i did an ad for " Got Milk? " when i was a child
2. i am terrified of the dark, butterflies & humming birds
3. i do not know how to burp (they sound like hiccups)
4. i was found & hired by a farming & food magazine (Hobby Farms) as their freelance photographer. i was found through Facebook, and i had no past experience & training as a photographer.
i guess having a cooking/picture hobby on Facebook can really get you lucky! (thanks to Peter)
5. i do not get along with females. All the friends i hang-out with are Dudes.
but, my best friend is a girl, named Tiffany, who i only get to see every 3 months or so .. (hate busy schedules!)
6. i have trouble pronouncing the word " Caterpillar ", and even though i was born in the USA, i was put in an ESL class because i could not read "The Hungry Hungry Caterpillar" in the 1st grade.
7. i dislike wonton soup because of previous food poisoning.
10 Dedications ;
i know i have to dedicate this to 10 other people,
but since i just recently started blogging, ill add these dedications on later.
So for now,
i nominate all the awesome, creative, friendly, & helpful bloggers out there!

Monday, February 7, 2011

Citrus Salad

This morning, i was in the mood for some fruit.
so i decided to try out a citrus salad recipe.
i admit, it was a bit odd to have a "salad" without any sort of lettuce,
it seemed more like a bowl of fruit with a little bit of seasoning/dressing.
Regardless, it was enjoyable, & the combination of fresh fruits was
a great way to start off my morning~
Grapefruit & Orange Salad
let me warn you first,
if youre not a fan of the bitterness of a grapefruit,
then dont follow this recipe.


instead try using blood oranges, mangoes
 or perhaps even sweet strawberries, paired with oranges~
Recipe ;
- 1 grapefruit ; with peel cut
- 1 orange ; with peel cut
- few slices of onions
- 1 tbs extra virgin olive oil
- 2 tbs balsamic or red wine vinegar
-  3 Olives pitted & diced (optional)
- Sprinkle of chillie or cayenne powder
- Sprinkle of sea salt
Cut the peels off the fruit with a sharp knife,
& slice them horizontally. Add the rest of the ingredients,
& youre done! Enjoy ~

The Classic Peanut-butter & Jelly;

Ah ~
the classic PB&J, always makes for a yummy snack.
i usually prefer mine with crunchy peanut butter, strawberry jam,
& a tall glass of ice-cold milk
but unfortunately it seems ive run out of the peanut butter chunchies ..
so its creamy brother was used instead.
no worries, still delicious !
Peanut-butter & Jelly Sandwich
(requested by & dedicated to Hilary)
yet another mini food!
i took a square cookie cutter &
cut-out 4 squares out of 2 loafs.
The result? adorable dainty little sandwiches ~

Thursday, February 3, 2011

A Good Sandwich & Even Better Shake ;

i opened up my fridge today, and i found a whole ham inside.
So, since i was in a sandwich-y mood, i decided to try a different take
on your typical "ham sandwich".
& to pair with that ? a freaking AVOCADO SHAKE !
okay, before you wrinkle your nose at the thought of an avocado in "Shake Form",
its simply, fucking . delicious .
& no, dont excuse my french.
i mean it ! this stuff is awesome !
its popular in Vietnamese Areas, and you can usually find them selling these
at vietnamese sandwich shops.
But i personally like making my own better. & its the only shake i drink.
Ham-Salad Sandwich
ah, the sandwich. A classic hand-held lunch time meal.
i love sandwiches! theyre so great .
easy to make & so yummy~

Recipe ;
- 1 cup chopped ham
- 1 stick celery, finely chopped
- 2 spoonfuls mayo
- 1 tbs chopped
- sprinkle of pepper
- 2 slices of toasted sourdough or potato bread
- spring mixed greens
- sliced tomatos
- dijon mustard
- sliced avocados
Recipe ;
Combine the first 5 ingredients in a mixing bowl
& arrange like any other sandwich!  yumm


Freaking Delicious Avocado Shake
This shake is truly a great way to enjoy
the nutritious fruit of the avocado.
its my #1 favorite shake to drink ~
3 words of advice ?
try. it . NOW.

Recipe ;
- 1 avocado, pitted
- 1/4 cup sugar (add more if needed)
- 2 1/2 cups milk
- 1 cup ice
- whip cream (optional)
(cream or vanilla yogurt can be used
as well for a more thicker shake,
just add with less milk. you can even
substitute the sugar & milk for
condensed milk, just add little milk by
the tablespoons. your shake
will be much stronger in avocado flavor
and it will be thicker .)
blend the first 4 ingredients together.
& feel free the adjust the recipe
according to desired thickness/sweetness.
Add whip cream over the top, & enjoy !

Homemade Food Event

During the last Sunday of January, i hosted a "Homemade Food Event"
Invited guests were advised to bring a dish, whether its a drink, appetizer, snack, dip, anything!
but it had to be HOMEMADE , & made by themselves.
& for those who didnt know how to cook, or just didnt have the time to make a dish,
they helped chip in a few $dollars to someone who was, just to be fair & to help out ~


Anyway, the event went pretty well, but i guess i  picked a bad weekend to host it,
it was the week before mid-terms & some of my friends pick sunday night as their "finish homework night".
But i didnt want to move it to another week because ive already had to postpone it twice.
So , the next time i host another Food Party, i shall pick an empty Saturday night ~


Back to the topic of food,
so since i was the host of this event, i felt i had to put a little more on the table.
i avoided main course meals, since majority of the guests were planning on brining heavier meals, such as Korean BBQ, Steak Kabobs, Pastas, etc.
So instead i made 2 snack appetizers, 1 drink, and 1 dessert.
Heres what i made :
Ingredients for My Mini Skewers
Recipe ;
- Toothpicks
- Mozzarella 
- Basil
- Salami (feel free to use any other dry meats)
- Baby Grape Tomatoes
Tomato, Basil, Salami & Mozzarella Skewer
i love these single appetizer bites!
simple to make, & super yummy.
combine them in whichever way you want,
i went with sort or a swirled-layered pattern ~
Spicy Potato Wedges (before the fryer)
these are actually small yellow spuds you can find at any
local grocery market.
ive noticed i  tend to find "mini food" alot cuter than
the normal sized foods you usually see everywhere else,
it also gives it a little more of a "special & personalized"
feel, haha.


Spicy Fried Potato Wedges
honesty, who DOESNT like potatoes ? especially if theyre
in fry form?!
these were absolutely delicious, straight out of the fryer.
spicy, crunchy, hot, starchy food of the Gods!

Recipe ;
- yellow mini potato spuds, sliced.
- cayenne pepper (add alot if u like it spicy!)
- parsley flakes
- garlic powder
- pepper
- salt
- dill
(sorry i have no measurements for the seasoning, its super
easy to just combine these spices according to preference.
but be sure to make enough of the spice mixture, since
you will need to coat the potatoes, twice.)
After you have prepared your seasoning, you add
your potato wedges & half the spice-mixture into a
large mixing bowl & toss them until theyre coated.
Drop them in the fryer until theyre golden brown.
As soon as theyre out of the fryer toss them back into the
bowl and sprinkle the spice mixture & toss again, until
fully coated.  Enjoy~
Preparing the Watermelon Citrus Drink
i used the watermelon shell as the punch bowl itself.
i cut off the top of it & also a thin slice of the bottom, so it
would be able to stand on its own.
be careful to NOT cut too deep into the flesh of the fruit,
or you will have leaking issues.
Hollowing Out
so as soon as i got it to stand, i started hollowing out
the fruit. Once again,
be careful to NOT puncture through
the bottom of the fruit.
Finished Punch Bowl
Mixing & Blending Process
look how much fruit i got out of that melon !
okay, so during this process is where i added the other
citrus fruits into the bowl.

Recipe ;
- 1 Watermelon
- juice of 1 Grapefruit
- juice of 3 Oranges
- juice of 1 lemon
- Sugar (if needed to be sweeter)
- 2 liter Fruit Soda (i used pineapple)
puree the fruit mixture in your blender, fill the watermelon
halfway with the mixture, & fill it the rest of the way up
with the fruit soda. Save the remainder of the fruit mix in
the fridge for later, when the bowl needs to be refilled ~
Watermelon & Citrus Drink
i needed the extra sweetness from the sugar, since its the
middle of winter & watermelon isnt in season... hehe~
Baking Yellow Cupcakes (buns)
this was actually a cake mix, since  the grocery store
didnt have a very wide selection of cupcakes,
i had to gamble a bit with this, but luckily these worked
just the same!
these yellow ones will be used as the "buns" or our
AWESOME cupcake creation.
if youve never baked cupcakes before, BE SURE TO ONLY
FILL UP THE CUPS  2/3rds OF THE WAY.
they WILL expand !
Baking Chocolate Cupcakes (hamburger meat)
you wont need as many chocolate cupcakes as you did
for the yellow ones, since you will be slicing these
horizontally to use as the "meat" portion of
your cupcake burger.
(1 choco cup cake = about 3-4 slices)
so feel free to indulge on the left over chocolate cakes~

if youve never baked cupcakes before, BE SURE TO ONLY
FILL UP THE CUPS  2/3rds OF THE WAY.
they WILL expand !
Cutting the Cupcakes
okay, heres the hardest part of making your
burger cupcakes. The red portion are the parts that you
dont need. which is the center slice, & the edges of the
muffin top. (just cut along the black dotted lines.)
The easiest way to remove the edges is to remove the
middle piece first, then flip the top upside down &
cut off the edges while rotating the top.
(it`ll be easier to understand if you look at the finished
product.)
Be sure to cut off the edges of the chocolate cupcake too,

& a bit off the top, to flatten it, so that the top bun can rest
more easily on the chocolate cupcake "pattie" .
be sure to slice the whole chocolate cupcakes into
equal even/flat slices.
Cupcake Burger !
is this freaking adorable or what?!
haha, this was a big hit amongst my friends,
they loved it !
it fooled my parents & friends, they really believed it was a
mini burger , haha

Recipe ;
- Coconut Shavings
- Green, Red, & Yellow food coloring
- Sesame seeds
- Sliced yellow & chocolate cupcakes
- White Frosting (i made mine from scratch)
if you want the recipe for simple frosting, "click here"
For the "Lettuce" portion of your burger,  add a few drops
of green food coloring to shaved coconut & mix.
Divide your frosting into 2 bowl & add red food coloring
for the "Ketchup" & yellow to the other for the
"Cheese / Mustard" portion of your cupcake burger.
(i dont like having too much frosting on my cakes, so i
drizzled the frosting around the edges only)
Once youre done stacking the "burger" sprinkle a few
sesame seeds over the top & enjoy your creative desserts !
Related Posts Plugin for WordPress, Blogger...